Detection Assays for Proteins: Chromogenic vs Chemiluminescent vs Fluorometric
by Pallabi Roy Chakravarty, Ph.D.

by Pallabi Roy Chakravarty, Ph.D.
Detecting a molecule of interest in your study sample is the focus of most bioscience experiments.
Among the different classes of biomolecules, proteins are frequently used in laboratories because proteins, among all biomolecules, commonly serve as the ultimate determinants of most physiological phenomenon.
Three main biophysical mechanisms form the backbone of protein detection techniques. These include chromogenic detection, chemiluminescence detection and fluorometric detection. Each technique has its advantages and disadvantages.
As an example, think about the COVID-19 pandemic – the virus’s spike protein is the pathogenic culprit. Understanding its composition and how it interacts is important when studying the disease.
Now that we appreciate the importance of detecting proteins, here are some further insights in this article regarding qualitative and quantitative detection of proteins.
This article focuses on the working principles of chromogenic, chemiluminescence and fluorometric detection methods, and how they differ.
.
In this article:
General principle of detection
Most common experimental procedures for qualitative and quantitative protein detection in the laboratory are Western blot, ELISA and Immunohistochemistry (IHC).
Each of these procedures involve immobilizing, that is restricting movement, your sample on a surface and then treating that surface with chemicals to detect your protein of interest. Immobilizing your sample proteins is important because it prevents your sample from getting washed away during chemical treatments.
Your protein of interest lies immobilized either:
Let’s compare a hypothetical immobilized protein to a small iron coin that is glued to a wall.
The room with the wall and the coin are completely dark, so you and no one else could see the coin or clearly make out the surface of the wall.
To find this coin, you would throw magnetic fragments at the wall. The magnetic piece will be attracted to the coin mounted to the wall, and end up landing on it.
Similarly, you treat the Western blot membrane or the Immunohistochemistry (IHC) slide or the wells for ELISA with an antibody that binds to your target protein with great specificity (shown in figure 1).
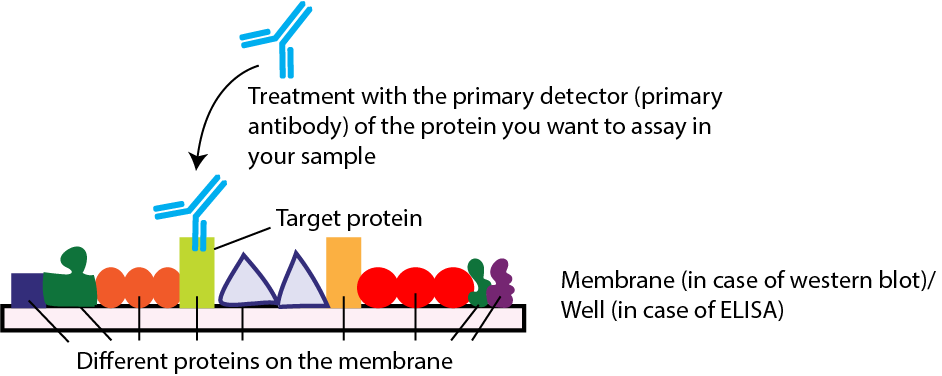
Figure 1. Illustration showing the first step of detection treating with the primary antibody.
Since this antibody is the primary tool that you used to detect your target, it is called a “primary antibody.”
But now, with the dark wall, how would you detect the magnet – analogous to the primary antibody in the context of your actual experiment?
For this, you throw an iron nail at the dark wall – it lands on your magnet, already bound to your target iron coin.

Figure 2. The second detection step with the secondary antibody conjugated to the detection machinery
This iron nail represents a second antibody or more commonly called“secondary antibody” that you use to detect your primary antibody bound to your target protein immobilized on the experimental surface.
Now, this iron nail has something special attached to it. Another way we would describe it is that it has something conjugated to it. And this conjugated item aids in visually detecting the magnet and ultimately the iron coin.
To imagine how this works, we’ll say that the nail has a special chemical - “chemical A” conjugated to it.
And when you spray another chemical - “chemical B” at the dark wall, it glows only when it meets chemical A.
This way, with the help of the glowing light produced by the reaction of chemicals A and B, you find your iron coin.
In your actual experiment, these hypothetical chemicals A and B and the mechanism of how they produce the glowing light for detection of your target, is the crux of the difference between the detection methods.
Three main different mechanisms are used in protein detection – chromogenic, chemiluminescence and fluorometric assays.
To help compare these assays, table 1 provides an easy lookup glance at each one side by side.
Table 1. Comparison of three detection methods.
|
|
Chromogenic |
Chemiluminescent |
Fluorometric
|
|
Detection mechanism
|
Color change |
Light emission |
Fluorescence |
|
Sensitivity
|
Low |
High |
Less than chemiluminescence |
|
Equipment needed
|
Qualitative: None Quantitative: colorimeter |
X-ray film/ phosphor screen, and development apparatus |
Specialized fluorescence detection apparatus |
|
Signal duration
|
Almost permanent |
Hours |
Weeks |
|
Cost
|
Least expensive |
Moderately expensive |
Most expensive |
|
Protein Detection |
Suited for high abundance proteins Not suited for low abundance proteins
|
Suited for low abundance proteins Not suited for detecting multiple proteins at once |
Suited for detecting multiple proteins at once using multiple fluorophores. |
“Chromo” is related to “color,” in chromogenic detection, the assay relies on a visual color change.
Keeping in mind the iron coin analogy, “chemical A” represents an enzyme that is conjugated to the nail – the secondary antibody.
“Chemical B,” in this case, represents a colorless substrate (S) in the assay that is cleaved by the enzyme to produce a colored product that can be visualized.
The mechanism of chromogenic detection is described in figure 3.

Figure 3. Representation for the mechanism of chromogenic detection
“Chemiluminescence,” as the name suggests, relates to the production of light (luminescence) due to a chemical reaction (chemi).
Figure 4. Mechanism of chemiluminescence detection
Figure 4 depicts a chemiluminescence detection.
Just like chromogenic detection, the enzyme conjugated to the secondary antibody cleaves the substrate (S) by a chemical reaction.
But, instead of forming a colored product, the reaction (chemical) leads to the production of light (luminescence).
This signal is typically captured using an x-ray film or a phosphor screen or even using a specialized instrument.
In fluorometric detection, the substrate is not required. Instead, detection is done using specialized equipment designed for fluorometric analysis.

Figure 5. Mechanism of fluorometric detection
As shown in figure 5, in fluorometric assays, the secondary antibody is labelled with a fluorophore.
Fluorophores are chemical compounds that emit light waves of a certain wavelength when excitedwith a light of a specific shorter wavelength. The emitted light helps in detecting the fluorophore molecule - and anything attached to it.
Now summarizing all the three detection methods together, figure 6 is a snapshot of the total detection process, depicting the difference in mechanism of each detection method.

Figure 6: Total detection process, depicting the difference in mechanism of each detection method.

Antibiotics and cell selection agents are used to select for specific cell populations to, for instance, generate a stable cell line or conduct a genetic...

Antibiotics are powerful tools that protect cell culture from contamination and help select for transfected cells. However, antibiotics can also have subtle impacts on resistant...

Antibiotics and cell selection agents are used to isolate cells that contain a particular resistance marker from a mixed population. These powerful reagents are used...

During my undergraduate internship I was making different formulations of insulin nanoparticles that would, in theory, be delivered through an inhaler and into the lungs....