How to Purify Antibodies with Proteins A, G, and L
by Simon Currie, Ph.D.

by Simon Currie, Ph.D.
One of the key uses for Protein A, Protein G, and Protein L is to purify antibodies for experimental or therapeutic purposes. Agarose beads with Proteins A, G, and L conjugated onto them are especially useful for this application. But if you’ve never used Protein A, G, or L agarose beads to purify antibodies before, you might be wondering how exactly to do it. If so, this is a great article for you.
Agarose beads with Protein A, G, or L attached to them are used to purify antibodies. Antibodies bind to Protein A, G, or L, while contaminating molecules are washed off the beads and out of the column. Then, the pH is lowered to elute the antibodies from the agarose beads.
In this article we’ll discuss using Protein A-, G-, and L-conjugated agarose beads to purify antibodies.
You will first want to choose whether to use Protein A, G, or L to purify your antibody. While Proteins A, G, and L all bind to antibodies, they each are especially good at binding to different subtypes of antibodies from different species. See Figure 1 and Table 1 to determine which protein would be best for purifying your antibody.
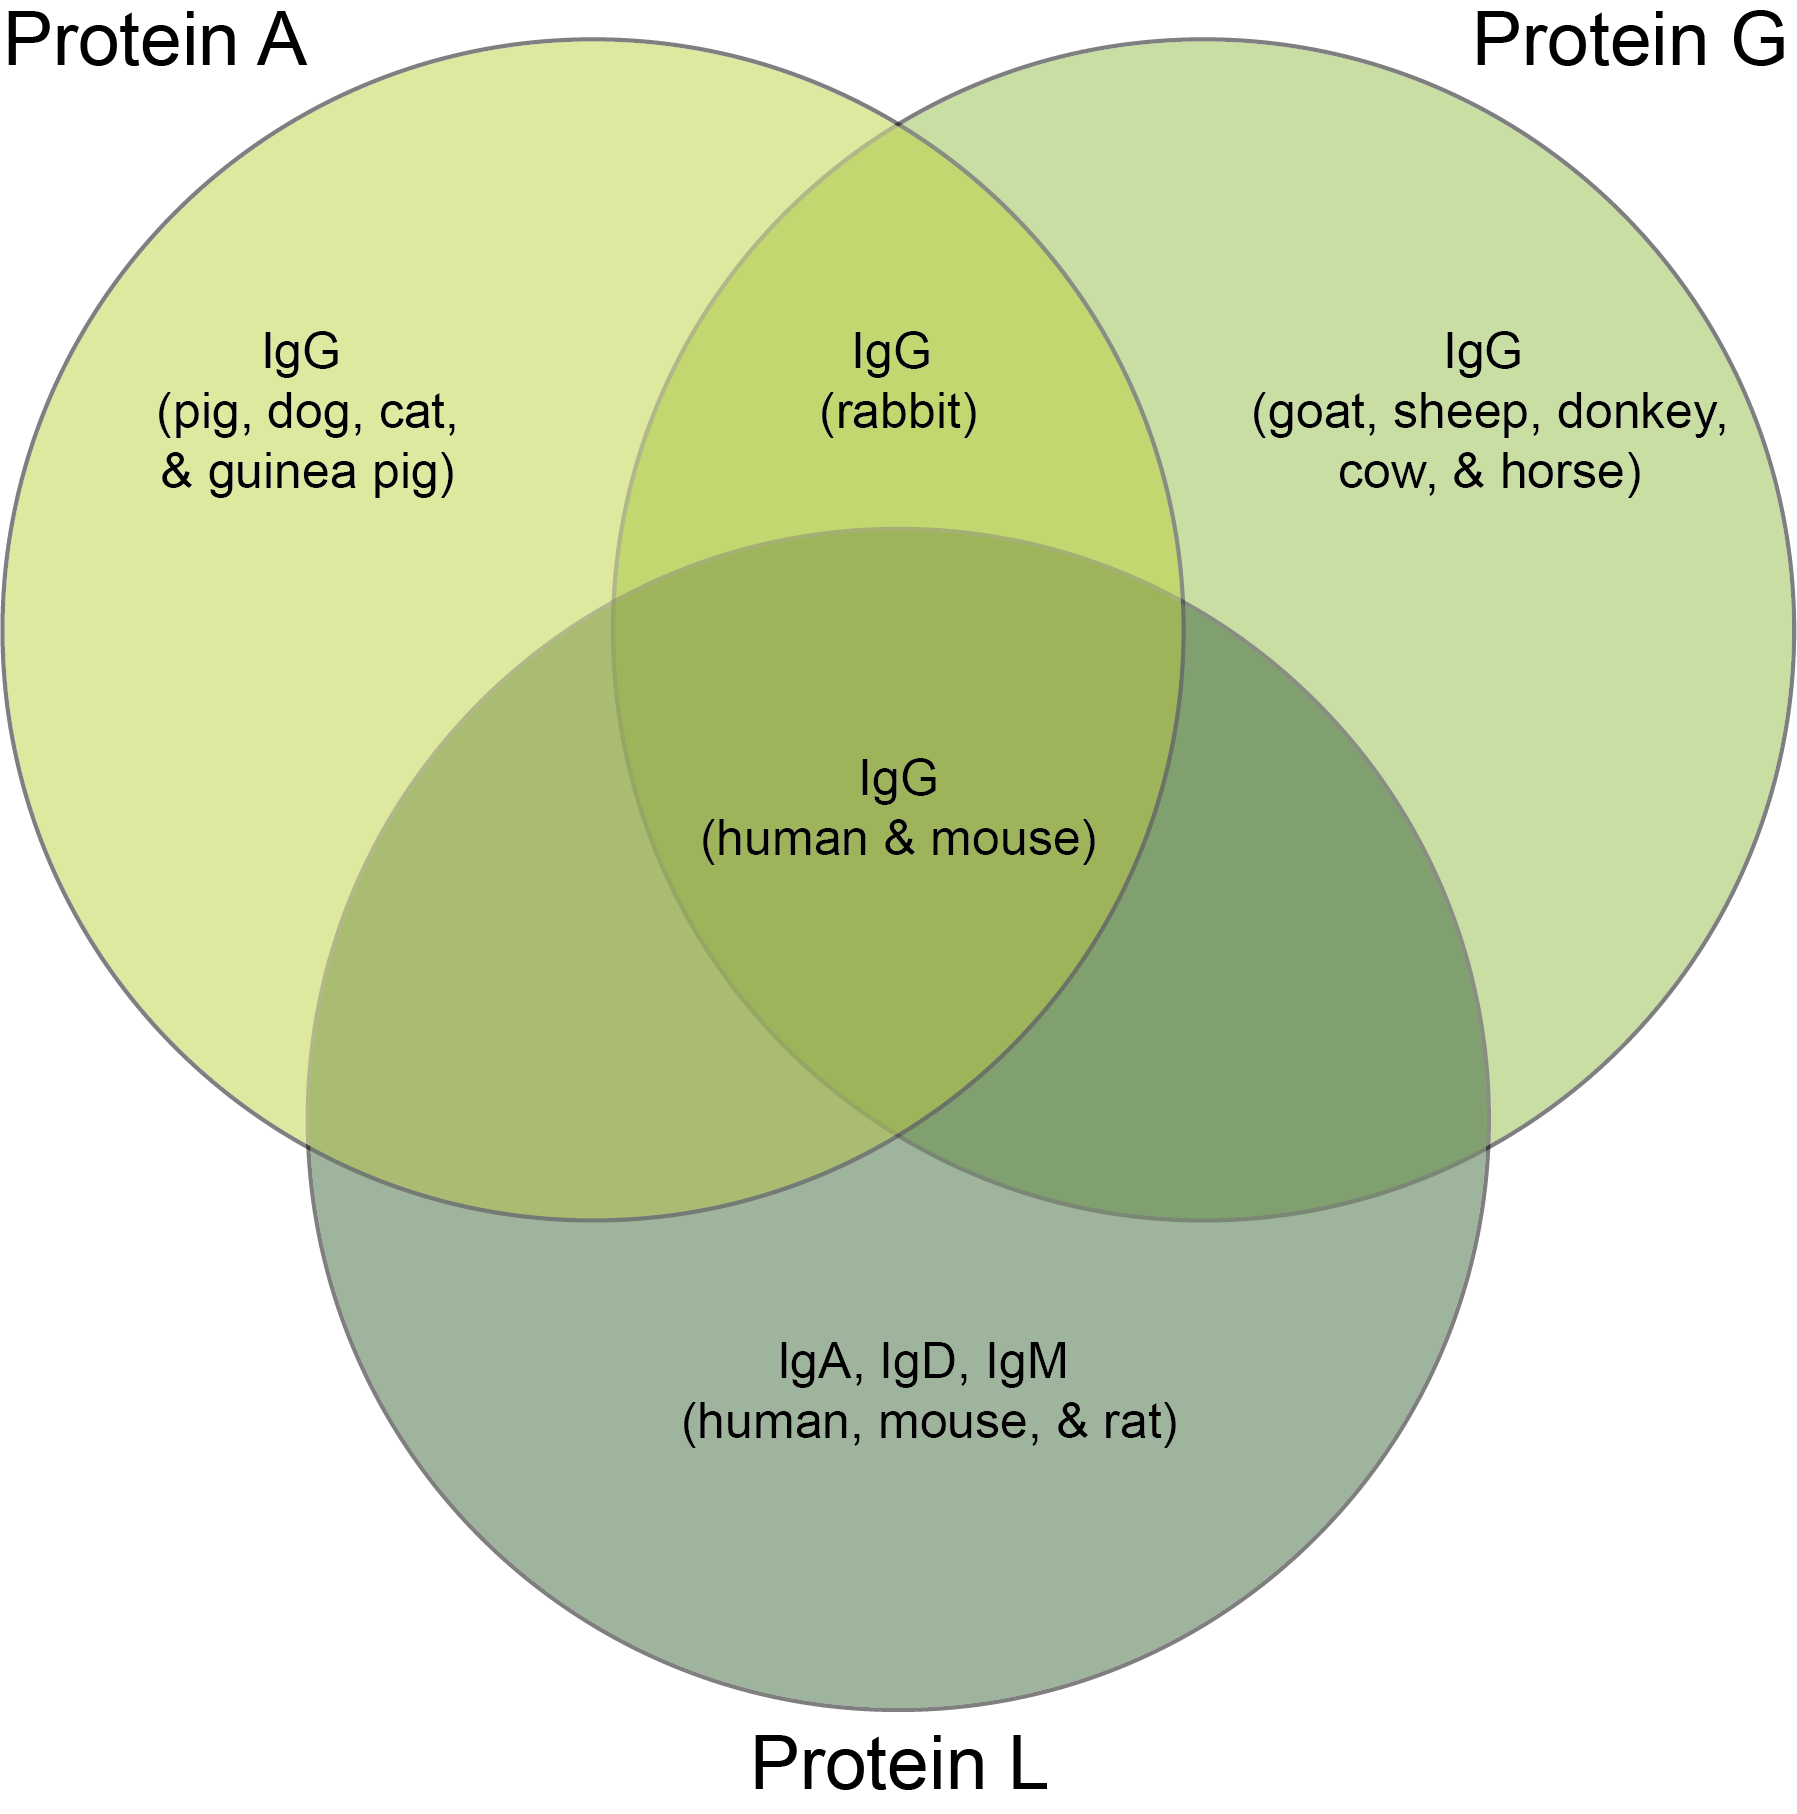
Figure 1.
Antibody species and class recognition by proteins A, G, and L.
Also, this article and this article has a lot more information on the differences between Proteins A, G, and L and how to decide between them.
Table 1. Antibodies recognized by Proteins A, G, and L
|
Species |
Subtypes |
Protein A / G / L |
|
Human & Mouse |
IgG |
A, G, & L |
|
Human, Mouse, & Rat |
IgA, IgD, & IgM |
L |
|
Rabbit |
IgG |
A & G |
|
Pig, Dog, Cat, & Guinea Pig |
IgG |
A |
|
Goat, Sheep, Donkey, Cow, & Horse |
IgG |
G |
We’ll use either a prepacked or a gravity-flow column to purify the antibodies. If using GoldBio’s Protein A-, Protein G-, or Protein L-conjugated agarose beads, then you’ll add these to a gravity-flow column, then wash and pre-equilibrate them in the load buffer as described below in the buffers and additional tips sections.
Proteins A and G bind to antibodies through the heavy chain whereas Protein L binds to antibodies through the light chain. For other key similarities and differences between Proteins A, G, and L – see this article.
Both interactions are used to bind antibodies to Protein A-, G-, or L-conjugated agarose beads in a column (Figure 2).
The other molecules in the mixture will flow through the column while the antibodies stick to Protein A, G, or L. Then, an elution buffer is added with an acidic pH to elute the antibody from the column. The acidic pH weakens the interaction between Protein A, G, or L and the antibody, which effectively releases the antibody from the column to be collected in the elution.
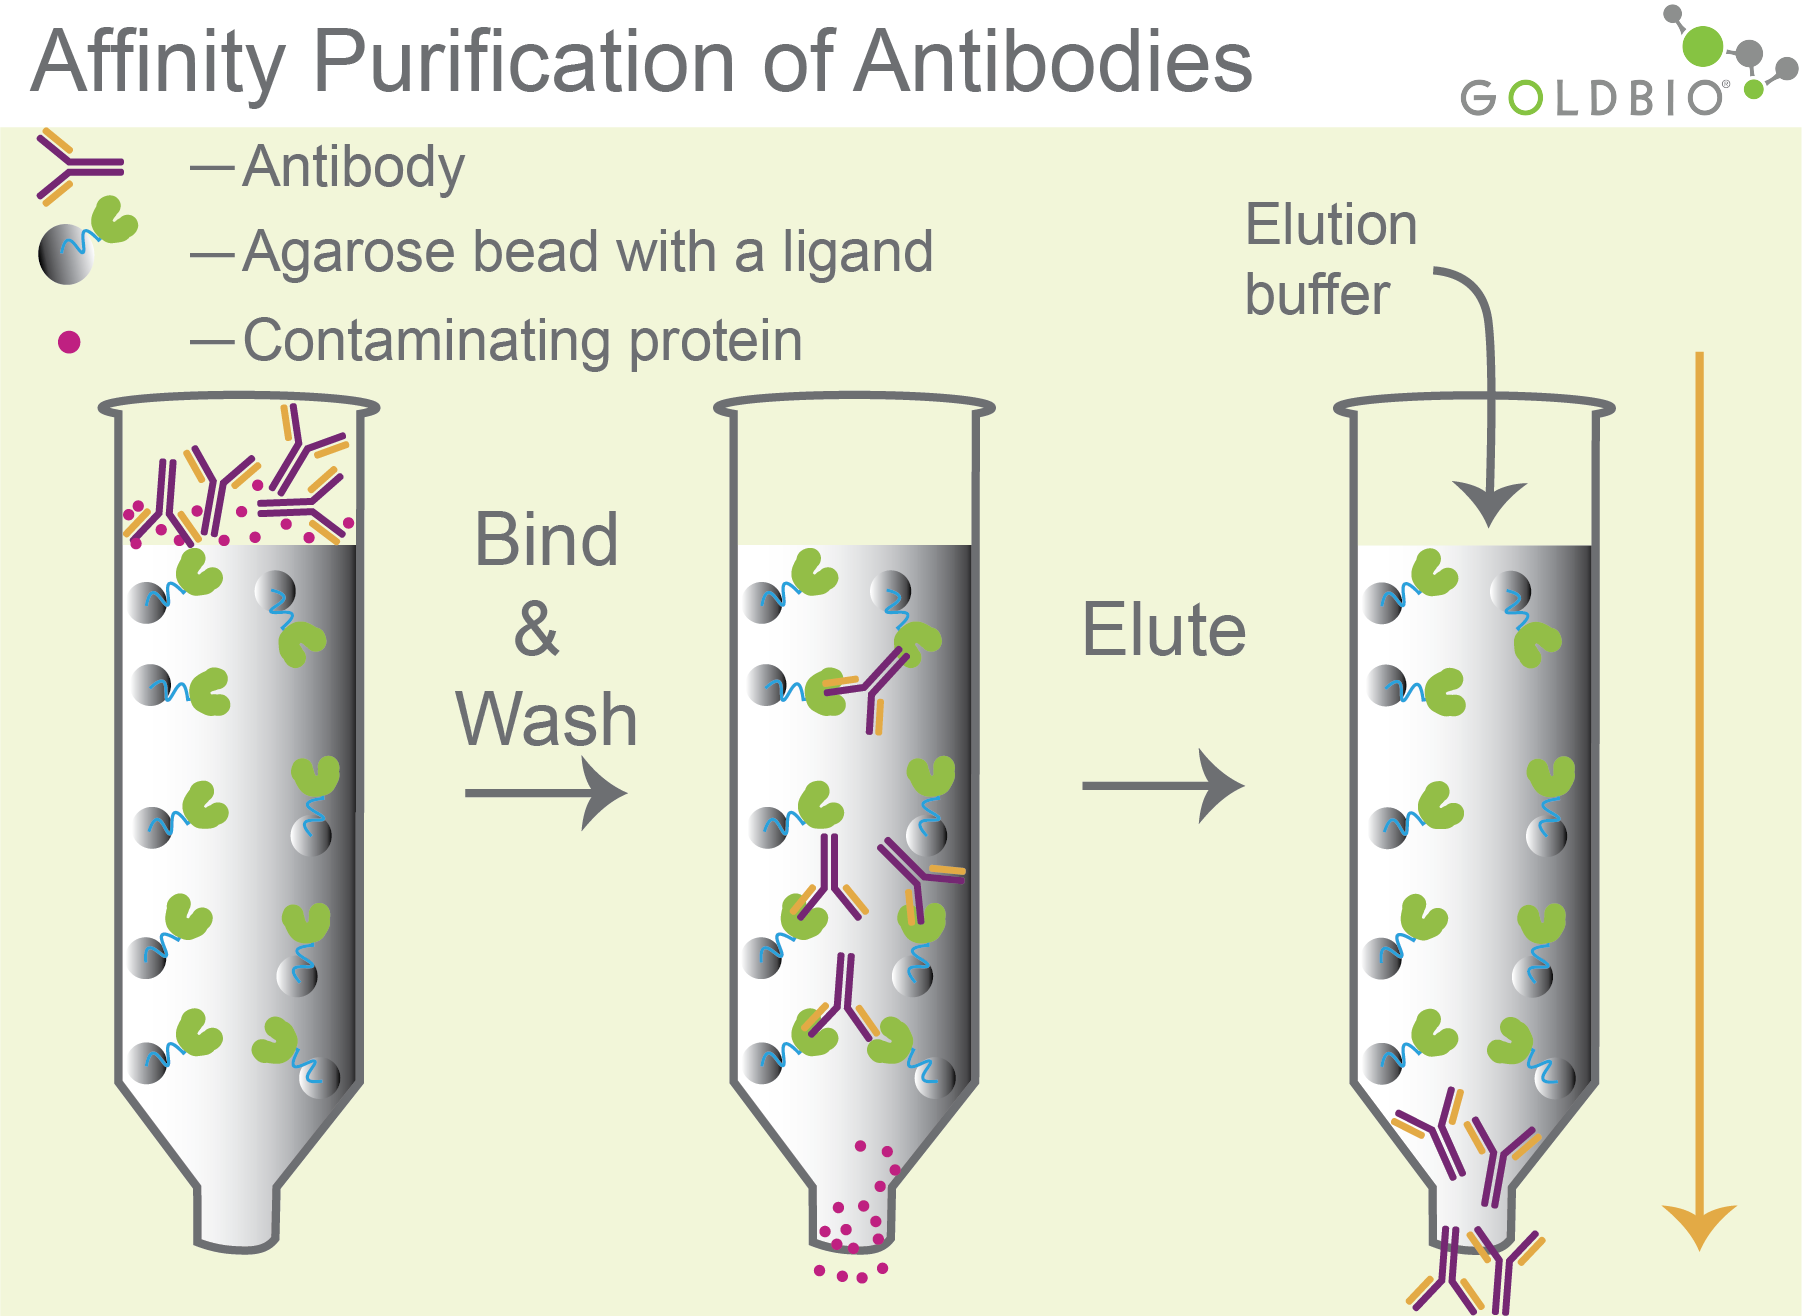
Figure 2. Purification of antibodies. Antibodies bind to agarose beads conjugated with interacting partner molecules such as protein A, G, or L (column 2). After washing, antibodies are eluted with an acidic pH elution buffer that weakens the interaction between the antibody and protein A (column 3).
Buffers are chemical solutions used in various biochemical applications, including protein purification. Key features of buffers are a pH buffer, salt, reducing agents, and sometimes other additives to keep the protein happy and stable.
For more general information about protein purification buffers, check out this article.
Before getting into the details of purification buffers, I should note that making buffers is kind of like making cookies in that there are a wide variety of buffers and there is no one exactly right way to do it. Rather, just like cookies, there a lot of good ways to make buffers and the “best” way may be a bit subjective. Alternatively, there are a few ways that making buffers can go horribly wrong. Ok, with that in mind, let’s go over some general buffers for antibody purification and then discuss the important and negotiable features of these buffers.
For antibody purification, we’ll discuss four different types of buffers: load, wash, elute, and neutralization buffers. As you’ll see, the load and wash buffers for this purification will be the same, so we’ll actually only need three different buffers.
The load buffer is the buffer that we will load the antibody onto the column with. For Proteins A-, G-, and L-conjugated agarose beads, Phosphate Buffered Saline (PBS) is a frequently used loading buffer. PBS matches the salt concentrations and standard pH of most mammalian cells (Figure 3). The pH is particularly important here as you’ll see in a few paragraphs that acidic pH is used to elute antibodies from the column. So, you want to use a buffer with a neutral to basic pH for this step, such as PBS. By the way – GoldBio’s PBS tablets are a great option for easy-to-make PBS buffer.

Figure 3. Buffers for antibody purification with Proteins A, G, and L.
Next, for the wash step we can again use PBS. During some affinity purifications, such as Ni2+ agarose beads and his-tagged proteins, you can optimize the wash step by adding a little bit of the eluting agent to prevent nonspecific binding to the column. That isn’t really the case for antibody purification with Protein A, G, or L, so we will just stick with PBS for this step.
Now that we want to elute, we are going to go with a buffer with a very acidic pH to weaken the interaction between the antibody and Protein A, G, or L. In Figure 3, you’ll see our suggestion for an elution buffer, but again the key thing to keep in mind is that the pH needs to be acidic enough for the antibody to elute (pH 2.5 - 4)(Liu et al, 2010).
Lastly, we need a neutralization buffer. This is because while acidic pH is needed to elute the antibodies from the column, antibodies are not very stable in acidic pH over the long term. So now we’ll add Tris base, which has a basic pKa, to the eluted antibody solution to neutralize the pH. If you have a downstream experiment or use for the antibody that uses a particular pH, feel free to adjust the solution to that particular pH. The important thing is that you typically want the pH to be between 6 and 8 for stable long-term storage (Liu et al, 2010).
It’s important to do this step quickly, so much so that some researchers will put the neutralization buffer in the elution collection tubes first so that the elution is essentially instantly neutralized as soon as it comes off of the column. If you want to do this, you should add about 0.15 mL of neutralization buffer per 1 mL of elution buffer.
If you’re fairly new to making buffers or purifying proteins, here’s a few additional tips that might be useful for a successful purification:
If you are already a protein-purifying professional, you may not need to abide by these tips every time. But on the chance the purification doesn’t go exactly like you thought it might – revisit these tips to see how you might get your purification back on track.
While this article has gone fairly in depth, you will find even more details and step-by-step protocols in the resources below, so check them out if you’re ready to start purifying antibodies with Proteins A, G, and L!
Antibody Purification Protocol for Proteins A, G, and L
Protein A and Protein G Troubleshooting Guide
Affinity Comparison of Protein A and Protein G for Various Antibody Classes

Ni2+ ions give nickel agarose beads their characteristic blue color. This blue color can fade or disappear completely when loading his-tagged proteins onto the column....

Nickel agarose beads change from blue to a brown or black color when the nickel ions have been reduced from a Ni2+ to a Ni1+...

The GoldBio Floating Tube Rack is one of our more clever giveaways because of the unique purpose it serves. And, with it also being one...

The characteristic blue color of nickel agarose beads comes from the 2+ oxidation state of the nickel ions. Color is also a useful indicator for...


